Monday, 27 August 2012

Thousand Layer Cake (Kueh Lapis Legit)

When I was younger, I’ve always looked forward to Chinese New Year because of all the wonderful goodies that we get to eat! Among all the snacks, my favourite has to be the Indonesian Thousand Layer Cake (also known as the Kueh Lapis in Singapore and Kek Lapis in Malaysia). Kueh Lapis, which literally means rich layer-cake, is made up of many very thin layers of cake piled on the top of each other. It is very rich for its size as it consists of large amounts of butter and sugar as well as many egg yolks. Because each layer is spread out and grilled separately, the cake is very moist, delicious and highly addictive.

This cake originated during colonial times in the Dutch East Indies and was believed to be the Dutch version of Baumkuchen (a layered cake resembling tree rings) incorporating popular local spices such as cinnamon, clove, mace and anise. Making this cake is very labour intensive as each layer is baked separately. Whenever I make this, preparing the cake batter takes me nearly an hour followed by another two over hours in front of the oven watching each layer grill. The layers need to be removed from the oven just as it is browned. Once, I took my eyes away from it for a few moments and that layer almost burnt!
Because it takes so much effort to make and has a lot of good quality ingredients, a large one (the size of the recipe below) can easily cost S$50-60. My instructor said that its definitely worth the effort to learn how to make this cake, so that you don’t have to pay so much for it outside, provided one has the patience to bake this! 
I made this Kueh Lapis for my kids’ teachers as a gift for the upcoming Teacher’s Day. I wanted to bake something to thank them for all the hard work they have put into caring for and coaching their class. After thinking about it, I decided on this cake because the process of making Kueh Lapis is very much like a teacher’s job. I know my children’s teachers work hard at imparting knowledge and values to their students, patiently building into their lives a little at a time.
Happy Teacher’s Day to all the teachers out there and thank you for all your hard work!
Thousand Layer Cake (Kueh Lapis) – 9 x 9 inch square
Recipe from a Community Centre baking demo by People Associations’s trainer Ms. Tay Tai Song
Ingredients
  • 500 g butter (Golden Churn tinned butter spread recommended – freeze the butter overnight then cut into pieces before using)
  • 22 pieces of egg yolk
  • 8 pieces of egg white
  • 300 g of sugar
  • 300 g condensed milk
  • 220 g cake flour
  • 1/2 tsp baking powder
  • 1 1/2 tsp lapis spices (Recommended: 1/2 tsp nutmeg, 1 tsp cinnamon powder)
  • 3 tbsp rum
Method
  • Pre-heat the oven to 195 to 200 degree Celsius.
  • Sift flour and spices together.
  • Butter mixture: Beat frozen butter and condensed milk till white, then set aside.
  • Egg mixture: Whisk egg whites and baking powder till stiff at medium speed. Add in sugar, then egg yolks one by one.
  • Stir in flour into the egg mixture (I used hand folding).
  • Mix in butter mixture into egg mixture in 3 rounds using a whisk (I used hand folding).
  • Mix in rum till blended in.
  • Line a square baking tin with paper, grease the paper well.
  • Heat the tin for 2 minutes in the heated oven.
  • Weigh out 130 g of batter and spread onto the baking tim. Bake the first layer till well browned.
  • Turn the oven to grill mode. Place a second layer of 100g and grill this second layer till brown. Repeat the grilling process for all subsequent layers of 100g each, till all the cake batter is used up.
  • Between each layer, press the cake down well using a lapis press.

Thursday, 23 August 2012

Lower-calorie Chocolate Whoopie Pies with Green Tea Cream

I have never heard of Whoopie Pies till recently when I started blogging and read about them from other food bloggers. Made up of two round mound-shaped pieces of cake with a sweet, creamy filling sandwiched between them, the Whoopie Pie is somewhat a cross between a cookie, pie, and cake.


According to food historians, Amish women would bake these desserts (known as hucklebucks, or creamy turtles at the time) and put them in farmers’ lunch pails or lunch boxes. When farmers would find the treats in their lunch, they would shout “Whoopie!” It is thought that the original Whoopie pies may have been made from cake batter leftovers.


I searched the web for a healthier version as I always try to cut down on fats and sugar when making desserts for my family. Here is a healthier version that uses wholemeal flour, mashed bananas and low-fat milk. I was a little worried about how this would turn out (as often times, bakes without butter/oil are rather dry and hard). However, these chocolate pies turned out to be delicious. It was very chocolate-y with a hint banana flavour. Though it has a slightly chewy texture, these Whoopie Pies were not dry at all. I actually thought this resembled brownies in many ways.


However, the cream turned out to be too sweet for my liking though. My kids were not fond of the cream either though they ate the chocolate pies with great relish (they got rid of the cream first). Overall, it is definitely a lovely treat!
Lower-calorie Chocolate Whoopie Pies with Green Tea Cream (makes 18 pies)
Recipe adapted from Glamour
Ingredients:
Cookie
  • 3/4 cup sugar
  • 2/3 cup mashed banana
  • 2 eggs
  • 1 cup skim milk
  • 2 teaspoons vanilla
  • 1 cup cocoa
  • 1 cup all purpose flour
  • 1 cup whole wheat flour
  • 1 1/4 teaspoon baking soda*
  • 1/2 teaspoon cream of tartar*
  • 1/2 teaspoon salt
* replaced baking soda + cream of tartar with 1 3/4 tsp of baking powder
Filling
  • 1 cup powdered sugar
  • 1/2 cup Neufchatel cream cheese
  • 1/4 cup non-fat plain Greek yogurt
  • 1 1/2 tsp of green tea powder (my own addition) – adjust according to your preference on how strong you like green tea flavour; and also on the fragrance of the green tea powder.
Instructions:
1. Preheat oven to 175°C. Spray nonstick spray on cookie sheets.
2. In a large bowl cream together sugar and banana. Add eggs, milk and vanilla. In a small bowl combine the cocoa, flour, baking soda, cream of tartar and salt.
3. Add the dry ingredients to the liquids beating together until smooth.
4. Drop batter (about 2 tablespoons at a time) on to the cookie sheets to make 18 cookies (I pipped it on as its neater)
5. Bake 15 minutes or until toothpick comes out clean.
6. To make the filling, cream together the cheese and sugar add yogurt and green tea powder and continue to mix until well blended.
7. Assemble sandwiches by spreading the filling on the flat side of one cookie and topping with another pressing down to distribute filling evenly. Repeat with remaining cookies and filling (I pipped the cream on).
8. Wrap whoopie pies individually in plastic wrap or place them in a single layer on a platter as they will stick if stacked on top of each other.

Sunday, 19 August 2012

Assam Prawns (Tamarind Prawns)

Over the last few weeks, I’ve been drooling over many mouth-watering Nyonya dishes posted by several blogger friends for the Malaysian Food Fest. I love Nyonya food and thought it would be great to be able to try out some dishes and take part in the event. However, I’m not much of a chef and the thought of cooking with unfamiliar ingredients seemed rather intimidating. Nyonya dishes are typically made up of many different types of ingredients and spices, some of which I have never heard of to begin with! Fortunately, I came across this Assam Prawn recipe, a Nonya favourite, which looked easy enough and had only a few ingredients.


This is my first attempt at cooking a Nyonya dish and it turned out pretty well. According to the recipe, you can either fry the prawns with or without the tamarind pulp and juice. I poured it in while the prawns were sizzling away on the pan and cooked  it till it dried up.  The marinade made the prawns very tasty and I love how the tamarind pulp and juice browned on the prawn shells. I found the prawns a little rather dry though (I read that some people like it this way) and I think it would have been perfect to have some tamarind sauce over the prawns. The next time I do this, I’ll make more of the marinade mixture, thicken it and serve it over the prawns.


A little history about Nyonya food – it also referred to as Straits Chinese food or Lauk Embok Embok, which is an interesting amalgamation of Chinese and Malay dishes thought to have originated from the Peranakan (Straits Chinese) of Malacca over 400 years ago.
Tamarind Prawn/Assam Prawns
Recipe from Rasa Malaysia
Ingredients
  • 8 oz shell-on prawns
  • 1 1/2 tablespoons tamarind pulp
  • 4 tablespoons water
  • 1 teaspoon sugar
  • 1/4 teaspoon salt
  • 3 tablespoons cooking oil
Method: Mix the tamarind pulp with 4 tablespoons water. Extract the juice from the tamarind by pressing the pulp. Remove the heads of the prawns. Devein the prawns by slitting the back. Rinse prawns with water and pat dry with paper towers. Add the tamarind juice and pulp, salt, and sugar into the prawns and mix well with your hand. Marinate for 15 minutes (I marinated for 30 minutes). Remove the tamarind pulp before cooking (I fried the prawns together with the tamarind pulp and juice). Heat up a wok and add cooking oil. As soon as it’s heated, drop the prawns into the wok and pan fry until cooked and slightly burnt. Dish out and serve immediately.

Thursday, 16 August 2012

Egg Tarts

I grew up eating egg tarts from Chinese dim sum restaurant and bakeries but did not know these were such popular snacks and even listed on the World’s 50 most delicious foods compiled by CNN Go in 2011. The egg tarts’ first recorded appearance were on the “Manchu-Han Imperial Feast” (满汉全席 Mǎn Hàn Quán Xí) - a lavish banquet for Emperor Kangxi which went on for days. They were featured as one of 32 delicacies.


Though egg tarts are more common in Asia, the best I have eaten were from a Chinese bakery tucked away in a back lane of San Francisco. Those egg tarts were so well known that there was always a long queue for it. Though it has been decades since, the buttery pastry and smooth egg custard left such an impression that whenever I feel like egg tarts, those were the ones I think of!
For a while, everyone in a particular baking group I follow seemed to be making egg tarts which made me crave for them again. I have always thought it was rather difficult to make and was surprised how easy it was. My first attempt did not turn out too badly though I think they could be more browned. I might increase the temperature of the oven a little towards the end of the bake when I make these again.
The pastry shell for egg tarts can either be a shortcrust (crumbly biscuit-like) or in a flaky, puff pastry-like layer form (the more well-known version).  Whichever the version, the pleasure of eating an egg tart is undoubtedly biting into a crumbly outer shell filled with silky smooth egg custard. Egg tarts, anyone?
Egg Tarts (makes 38-40 tarts)
Recipe from Munch Ministry
Short Crust Pastry
  • Softened unsalted butter 250 g
  • Castor sugar 120 g
  • 1 egg
  • Plain flour 500 g
Method 
  • Cream the butter and sugar till creamy. (I creamed it using a whisk for about 3 to 5 minutes)
  • Add in the egg and mix well.
  • Lastly add in the flour and mix to form a soft dough. If the dough is sticky, you can add some more flour (a little at a time) till it is smooth and not sticky .
  • Mould into the small cupcake mould till the dough is used up.
  • Pour in the egg custard till its almost full.
Egg Custard 
  • Water 350 g
  • Castor sugar 120 g
  • Fresh milk 100 g
  • 5 eggs
Method

  • Place water and sugar in a pot and boil till sugar is dissolved. Let it cool completely.
  • Add milk into the sugar mixture and stir.
  • Lightly beat the egg and add into the above.
  • Mix well and strain the egg mixture.
  • Pour into the prepared cup and bake at 160 Deg C for 20-25 mins or till the crust is slightly brown (I baked it for about 30 minutes)
  • Remove the tarts by turning the mould over and knocking the base gently. The tarts should come out easily.
Note : Prepare the egg custard first before the dough.
How to mould the pastry:
1. Place a ball of dough into the mould. I use 25 g of dough for each mould (6 cm across).
2. Press the dough with your thumb to spread it out all over the mould.
3. Make sure that the tart base is not too thick and some of the dough should spill over the edge of the mould.
4. Trim the excess dough off using a sharp knife.
The history of egg tarts is extracted from World of Chinese. 
###

Monday, 13 August 2012

Tofu and Soya Bean Cheesecake

My family is a huge fan of tofu, and we eat it several times a week cooked in a variety of ways. Naturally, this Tofu and Soya Bean Cheese Cake was a big hit at home. The tofu cheese layer, which sits on top of a layer of chiffon cake, is lighter and healthier than other cheese cakes as the tofu replaces some of the cream cheese and whipping cream


The soya bean powder adds a lovely fragrance to both the cheese and chiffon layer. The tofu and cheese layer has a melt-in-the-mouth texture and goes well with the springy chiffon cake. I have made this cake three times, each time trying to improve my layering skills and remove the cheesecake from the cake ring without damaging it. The instructor taught us to use a hair dryer to heat up the cake ring so that the cake ring will expand and can be easily removed. Another method is to dip a knife in hot water and run the knife along the sides of the cake (this did not work so well as I ended up with rather ugly edges). This tofu cheese cake can be made without the chiffon cake layer – simply use a base of crushed digestive biscuits mixed with melted butter.


Tofu and Soya Bean Cheese Cake (8 x 8 inch)
Recipe by Phoon Huat

Chiffon Layer

  • 5 egg yolks
  • 3 egg whites
  • Brown sugar 80 g
  • Soya bean powder 30 g
  • Top flour 40 g
  • Unsalted butter, melted 30 g (I substituted with 30 g of oil)
Method
  • Whisk egg whites till fluffy, add in sugar and beat until doubled in volume and stiff.
  • Add in egg yolks and beat till just mixed in.
  • Fold in flour gently and in one direction using a spoon or whisk.
  • Fold in oil gently in one direction using a spoon or whisk till everything is well mixed in.
  • Pour into a 9 inch baking tin which is lined at the bottom.
  • Bake at 190 Celsius for 12-15 minutes till a toothpick inserted into the centre comes out clean.
  • When it is ready, remove the cake from the baking tin and allow to cool down on a cooling rack. Cover the cake to prevent it from drying out.
  • When the cake is cooled, place an 8 inch square cake ring onto the cake and trim off the excess cake outside the ring. This will help the cake fit snugly into the ring so that the tofu cheese layer does not seep through. Place the cake ring with the cake inside on a serving tray.  You can also use a baking tin with a removable base, but make sure the cake fits the size of the baking tin. 
Tofu Cheese Layer
Group A:
  • Cream cheese, softened at room temperature 230 g
  • Caster sugar 70 g
  • Smooth silken tofu 230 g
  • Sour cream or yoghurt 50 g
  • Soya bean powder 30 g
Beat cream cheese and sugar on high speed for 3 minutes. Add in tofu, yoghurt and soya bean powder and beat on high speed for another 4 to 5 minutes.
Group B:
  • Diary whipping cream 50 g
Whip the diary whipping cream till stiff and place in refrigerator until you need it.
Group C:
  • Soya bean milk 100 g (Another option is to use 30 g of soya bean powder and mix with enough water to get 100 g of soya bean milk)
  • Gelatine 15 g
Double boil soya bean milk and gelatine over a water bath till the gelatine is completely dissolved.
Method
Combine Group A, B and C ingredients and mix well. Pour the mixture onto of the cake layer in the cake ring. Refrigerate for 2-4 hours till the tofu cheese layer is set. Sprinkle with soya bean power and cut into squares to serve (I added some green tea powder into the soya bean powder for colour).


Friday, 10 August 2012

Blueberry Coffee Cake


In this edition of the The Home Bakers  event hosted by Joyce from Kitchen Flavours, we are baking Lou Seibert Pappas’ Strawberry Coffee Cake from the book Coffee Cakes: Sweet and Savoury.

The first time I made the cake I used strawberries, which were rather sour and made the cake slightly tangy. The directions from the recipe was to layer the sliced strawberries on top of the cake batter followed by another layer of cake batter. When I did that,  the strawberries separated the two layers and the top of cake basically fell off. I think it’s a better idea to chop the strawberries and mix it into the batter.
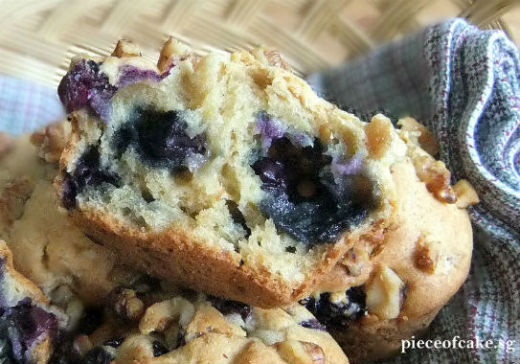
Since I was not very happy with the results of that first cake, I made this recipe a second time round with blueberries and turned this into a Blueberry Coffee Cake. They were really delicious and I like this version better as the blueberries were sweeter than the strawberries.
I really enjoyed this cake which has a moist and flavourful texture from the addition of cream cheese. The walnuts sprinkled on top of the cake added crunch to the cake. I made half the recipe and this yielded 7 cupcakes. The ingredients for 7 cupcakes are listed below:
Strawberry/Blueberry Coffee Cake (7 cupcakes)
  •  114 g of cream cheese at room temperature
  • 57 g of unsalted butter at room temperature
  • 1/4 cup + a little more of granulated sugar
  • 1/8 cup of milk
  • 1 large egg
  • 1/2 tsp of vanilla extract
  • 1 cup unbleached all purpose flour
  • 1/2 tsp baking powder
  • 1/4 tsp baking powder
  • 1/8 tsp or pinch of salt
  • 1 1/2 cup of blueberries or strawberries (I reduced to 1 cup as I find that 1 1/2 cup is too much)
  • 1/8 cup of firmly packed brown sugar
  • 1/4 cup of chopped almonds/walnuts
For the full recipe, please visit Alice from I Love. I Cook. I Bake. 

Tuesday, 7 August 2012

Apple-Cornmeal Upside-Down Cake


 had my initial reservations about this Bon Appetite recipe as I thought cornmeal is more suited for savoury bakes rather than sweet ones.  I did not think this was going to taste good, but I was so wrong. This is by far, one of the most moist and delicious cakes I have made.  The best part are  the beautifully caramelised apples on top (or the bottom if you look at it from a different perspective) of the cake.

The apples set at bottom of the pan browned beautifully giving the top of the cake a lovely golden tone.

I love the way these caramelised apples look right after they came out of the frying pan – they remind me of golden roasted potatoes. I made half the recipe in a 6 inch tin and immediately wished I made the full recipe after I took my first bite.
 The cake is totally divine served warm with ice cream – a slice of heaven on earth.
Apple-Cornmeal Upside-Down Cake (9 inch)
Ingredients
  • 8 tablespoons (1 stick) unsalted butter, room temperature
  • 1/2 cup plus 3/4 cup sugar
  • 1 1/2 pounds Braeburn or Golden Delicious apples (about 4 medium), peeled, quartered, cored, each quarter cut into 2 wedges
  • 3/4 cup all purpose flour
  • 2 teaspoons baking powder
  • 1/2 teaspoon salt
  • 1/3 cup yellow cornmeal
  • 1/2 cup boiling water
  • 2 large eggs
  • 1 teaspoon vanilla extract
  • 1/3 cup whole milk
  • Vanilla ice cream
Method
  • Preheat oven to 350°F (175°C) . Generously butter 9-inch-diameter cake pan with 1 1/2-inch-high sides; line pan with 10-inch-diameter parchment paper round (parchment will come 1/2 inch up sides of pan). Butter parchment. Melt 2 tablespoons butter in 10-inch-diameter nonstick skillet over medium heat. Add 1/2 cup sugar and cook until sugar dissolves and mixture turns deep golden brown, stirring occasionally, about 6 minutes. Add apple wedges and gently shake skillet to distribute caramel evenly. Cover and cook until apples release their juices, about 5 minutes. Uncover and cook until apples are tender and caramel thickens and coats apples, stirring occasionally, about 13 minutes. Transfer apples and caramel syrup to prepared cake pan, spreading evenly.
  • Whisk flour, baking powder, and salt in small bowl to blend. Place cornmeal in large bowl; pour 1/2 cup boiling water over and stir to blend. Add 6 tablespoons butter and 3/4 cup sugar to cornmeal mixture. Using electric mixer, beat until well blended. Beat in eggs and vanilla. Beat in flour mixture alternately with milk in 2 additions each. Pour batter over apples in pan.
  • Bake cake until golden and tester inserted into center comes out clean, about 40 minutes. Cool cake in pan 5 minutes. Run small knife between cake and pan sides to loosen cake. Carefully invert cake onto ovenproof or microwavable platter and peel off parchment. Cool 15 minutes.
DO AHEAD: Cake can be made up to 6 hours ahead. Rewarm in 350°F oven about 10 minutes or microwave on medium just until slightly warm, about 2 minutes.

Friday, 3 August 2012

Black Sesame Loaf


I attended a few baking demos recently and this is one of the bread recipes I picked up which has since become a family favourite. This recipe yields a delicious and healthy black sesame sandwich loaf with a soft and fluffy texture.

I did not know black sesame has so many health benefits. A little research online showed that they are an excellent source of many essential minerals as well as a very good source of vitamin B1 (thiamin) and dietary fiber. The nutrients found in sesame seeds may contribute to cardiovascular health, reduce inflammation, support respiratory health, protect against colon cancer and osteoporosis as well as other conditions. I am using organic black sesame seeds and paste from the health food store, which hopefully makes it even healthier.


The bread keeps well and its texture remained soft for a couple of days (not as soft as when freshly baked but much better than loaves baked in the bread machine) . It has a light  sesame taste which is not over-powering, making it a delicious loaf to go with your favourite spreads. I did not think my kids were going to eat this bread, but they really enjoyed it with jam, peanut butter and chocolate spread.


Black Sesame Loaf (Makes 3 loaves of 300 g each)
Recipe adapted from a baking class at Phoon Huat
Ingredients
  • Plain flour 340 g
  • Bread flour 160 g
  • Water 300 g
  • Salt 2 tsp
  • Dry Yeast 10 g
  • Full cream milk powder 2.5 tbsp
  • Fine sugar 20 g
  • Vegetable oil 30 g
  • Black sesame seeds (toasted) 60 g
  • Black sesame paste 30 g
Method
  • Put all the ingredients into the mixing bowl except for the salt, oil, black sesame seeds and paste.
  • Mix on slow speed till a soft dough is formed then add in salt, oil, black sesame seeds and paste (total 2-3 mins of mixing).
  • Turn the mixer onto high speed and mix the dough for 7-8 mins.
  • Take the dough out of the mixer and rest the dough for about 30 mins, covered
  • Divide the dough into 3 balls and rest for another 20 mins, covered
  • After the 20 mins, take each ball of dough and roll it out on a floured surface (Step 1 and 2 below). Roll the dough up like a Swiss Roll (Step 3 below) and tuck the sides in (Step 4 below).
  • Place each piece of dough into individual baking tins. Cover the tins and let the bread loaves proof for another 45mins to 1 hour till they double in size.
  • Bake at 190 degrees C for 20-25 minutes till the surface of the loaves are evenly browned.